Opinions
“[…] I’m using FastAPI a ton these days. […] I’m actually planning to use it for all of my team’s ML services at Microsoft. Some of them are getting integrated into the core Windows product and some Office products.”
“We adopted the FastAPI library to spawn a REST server that can be queried to obtain predictions. [for Ludwig]”
“Netflix is pleased to announce the open-source release of our crisis management orchestration framework: Dispatch! [built with FastAPI]”
“I’m over the moon excited about FastAPI. It’s so fun!”
“Honestly, what you’ve built looks super solid and polished. In many ways, it’s what I wanted Hug to be - it’s really inspiring to see someone build that.”
“If you’re looking to learn one modern framework for building REST APIs, check out FastAPI […] It’s fast, easy to use and easy to learn […]”
“We’ve switched over to FastAPI for our APIs […] I think you’ll like it […]”
“If anyone is looking to build a production Python API, I would highly recommend FastAPI. It is beautifully designed, simple to use and highly scalable, it has become a key component in our API first development strategy and is driving many automations and services such as our Virtual TAC Engineer.”
Typer, the FastAPI of CLIs
![]()
If you are building a CLI app to be used in the terminal instead of a web API, check out Typer.
Typer is FastAPI’s little sibling. And it’s intended to be the FastAPI of CLIs. ⌨️ 🚀
Requirements
FastAPI stands on the shoulders of giants:
Example
Create it
- Create a file
main.pywith:
from typing import Union

from fastapi import FastAPI

app = FastAPI()


@app.get("/")
def read_root():
    return {"Hello": "World"}


@app.get("/items/{item_id}")
def read_item(item_id: int, q: Union[str, None] = None):
    return {"item_id": item_id, "q": q}
Or use async def...
If your code uses `async` / `await`, use `async def`:
```Python hl_lines="9 14"
from typing import Union
from fastapi import FastAPI
app = FastAPI()
@app.get("/")
async def read_root():
return {"Hello": "World"}
@app.get("/items/{item_id}")
async def read_item(item_id: int, q: Union[str, None] = None):
return {"item_id": item_id, "q": q}
```
**Note**:
If you don't know, check the _"In a hurry?"_ section about `async` and `await` in the docs.
Run it
Run the server with:
About the command fastapi dev main.py...
The command `fastapi dev` reads your `main.py` file, detects the **FastAPI** app in it, and starts a server using Uvicorn.
By default, `fastapi dev` will start with auto-reload enabled for local development.
You can read more about it in the FastAPI CLI docs.
Check it
Open your browser at http://127.0.0.1:8000/items/5?q=somequery.
You will see the JSON response as:
{"item_id": 5, "q": "somequery"}
You already created an API that:
- Receives HTTP requests in the paths
/and/items/{item_id}. - Both paths take
GEToperations (also known as HTTP methods). - The path
/items/{item_id}has a path parameteritem_idthat should be anint. - The path
/items/{item_id}has an optionalstrquery parameterq.
Interactive API docs
Now go to http://127.0.0.1:8000/docs.
You will see the automatic interactive API documentation (provided by Swagger UI):

Alternative API docs
And now, go to http://127.0.0.1:8000/redoc.
You will see the alternative automatic documentation (provided by ReDoc):

Example upgrade
Now modify the file main.py to receive a body from a PUT request.
Declare the body using standard Python types, thanks to Pydantic.
”`Python hl_lines=“4 9-12 25-27” from typing import Union
from fastapi import FastAPI from pydantic import BaseModel
app = FastAPI()
class Item(BaseModel):
name: str
price: float
is_offer: Union[bool, None] = None
@app.get(“/”) def read_root():
return {"Hello": "World"}
@app.get(“/items/{item_id}”) def read_item(item_id: int, q: Union[str, None] = None):
return {"item_id": item_id, "q": q}
@app.put(“/items/{item_id}”) def update_item(item_id: int, item: Item):
return {"item_name": item.name, "item_id": item_id}
The `fastapi dev` server should reload automatically.
### Interactive API docs upgrade
Now go to <a href="http://127.0.0.1:8000/docs" class="external-link" target="_blank">http://127.0.0.1:8000/docs</a>.
* The interactive API documentation will be automatically updated, including the new body:

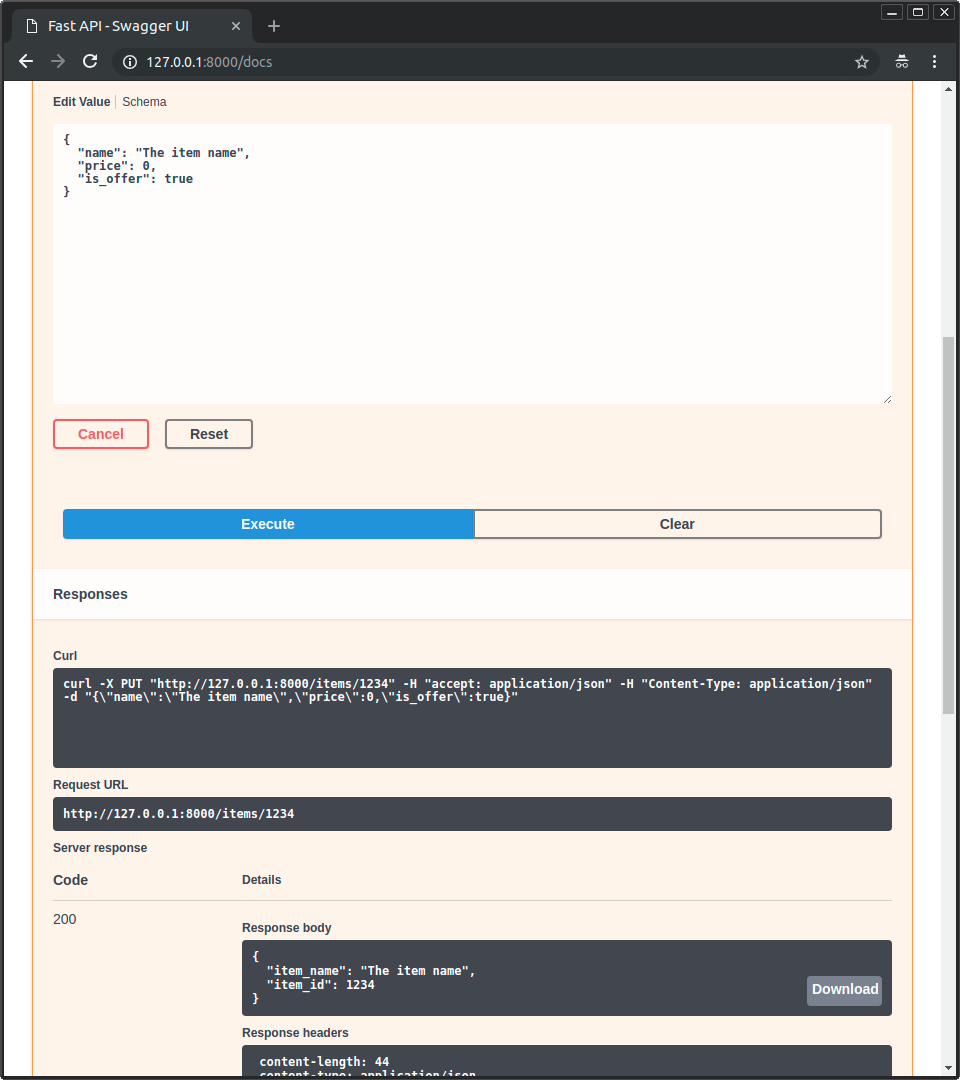
* Click on the button "Try it out", it allows you to fill the parameters and directly interact with the API:

* Then click on the "Execute" button, the user interface will communicate with your API, send the parameters, get the results and show them on the screen:
### Alternative API docs upgrade
And now, go to <a href="http://127.0.0.1:8000/redoc" class="external-link" target="_blank">http://127.0.0.1:8000/redoc</a>.
* The alternative documentation will also reflect the new query parameter and body:

## Performance
Independent TechEmpower benchmarks show **FastAPI** applications running under Uvicorn as <a href="https://www.techempower.com/benchmarks/#section=test&runid=7464e520-0dc2-473d-bd34-dbdfd7e85911&hw=ph&test=query&l=zijzen-7" class="external-link" target="_blank">one of the fastest Python frameworks available</a>, only below Starlette and Uvicorn themselves (used internally by FastAPI). (*)
To understand more about it, see the section <a href="https://fastapi.tiangolo.com/benchmarks/" class="internal-link" target="_blank">Benchmarks</a>.
## `fastapi-slim`
If you don't want the extra standard optional dependencies, install `fastapi-slim` instead.
When you install with:
```bash
pip install fastapi
…it includes the same code and dependencies as:
pip install "fastapi-slim[standard]"
The standard extra dependencies are the ones mentioned above.